Showing posts with label Craftiness. Show all posts

Friday, January 20, 2012

SIGNS!!! DIY Tutorial for Making Custom Signs

I can't tell you how many adorable signs I've seen on Pinterest, or perhaps just hilarious quotes that I wish were on a sign. So for Christmas this year I decided to make some for gifts. I didn't remember to document those, but luckily it was Tad's birthday yesterday so I had another chance!

Honestly the hardest part is decided which quotes to put on the board, but that's where Google and Pinterest come into play. Here is my awesome tutorial for a thrifty way to make your own awesome sign for an awesome price.

Step 1: Buy a piece of wood
I got this at Lowes for around $11. There's a great selection there with boards of various sizes, I didn't have to cut this at all. At Christmas I got a board that was about this tall but a lot wider and had Tad cut it in two and I made two signs :) You can get smaller boards at craft stores like Michaels, or just use scrap wood.

Step 2: Pick a Quote, Print it out in whatever font you want

Step 3: Rub pencil lead on the back of your lettering. Make sure you cover it well.

Step 4: Cut out your words and tape them on the board how you want them.
I used measurements and drew strait lines on my boards for Christmas, but this time I just eye-called it. I say do whichever you like! I especially liked using a figure on this board, I think it made it a little more unique. Tad loves his MJ.

Step 5: Trace your lettering with a pencil.
You don't need to press really hard, just use a 'medium' amount of pressure.

Step 6: Paint in the lines.
Try and find a paintbrush with a nice skinny-tip, especially if you've chosen a font that's thin. When choosing a paint color remember that the stain will darken it.

Step 7: Make sure you have the stain you want and rubber gloves.

Step 8: Lay your board out on plastic, and use a rag to stain your board.
I used garbage bags and it worked great. You can either apply extra coats to make it darker, or rub off excess stain to lighten it a little. So start with a light coat!

Step 9: Let it dry.

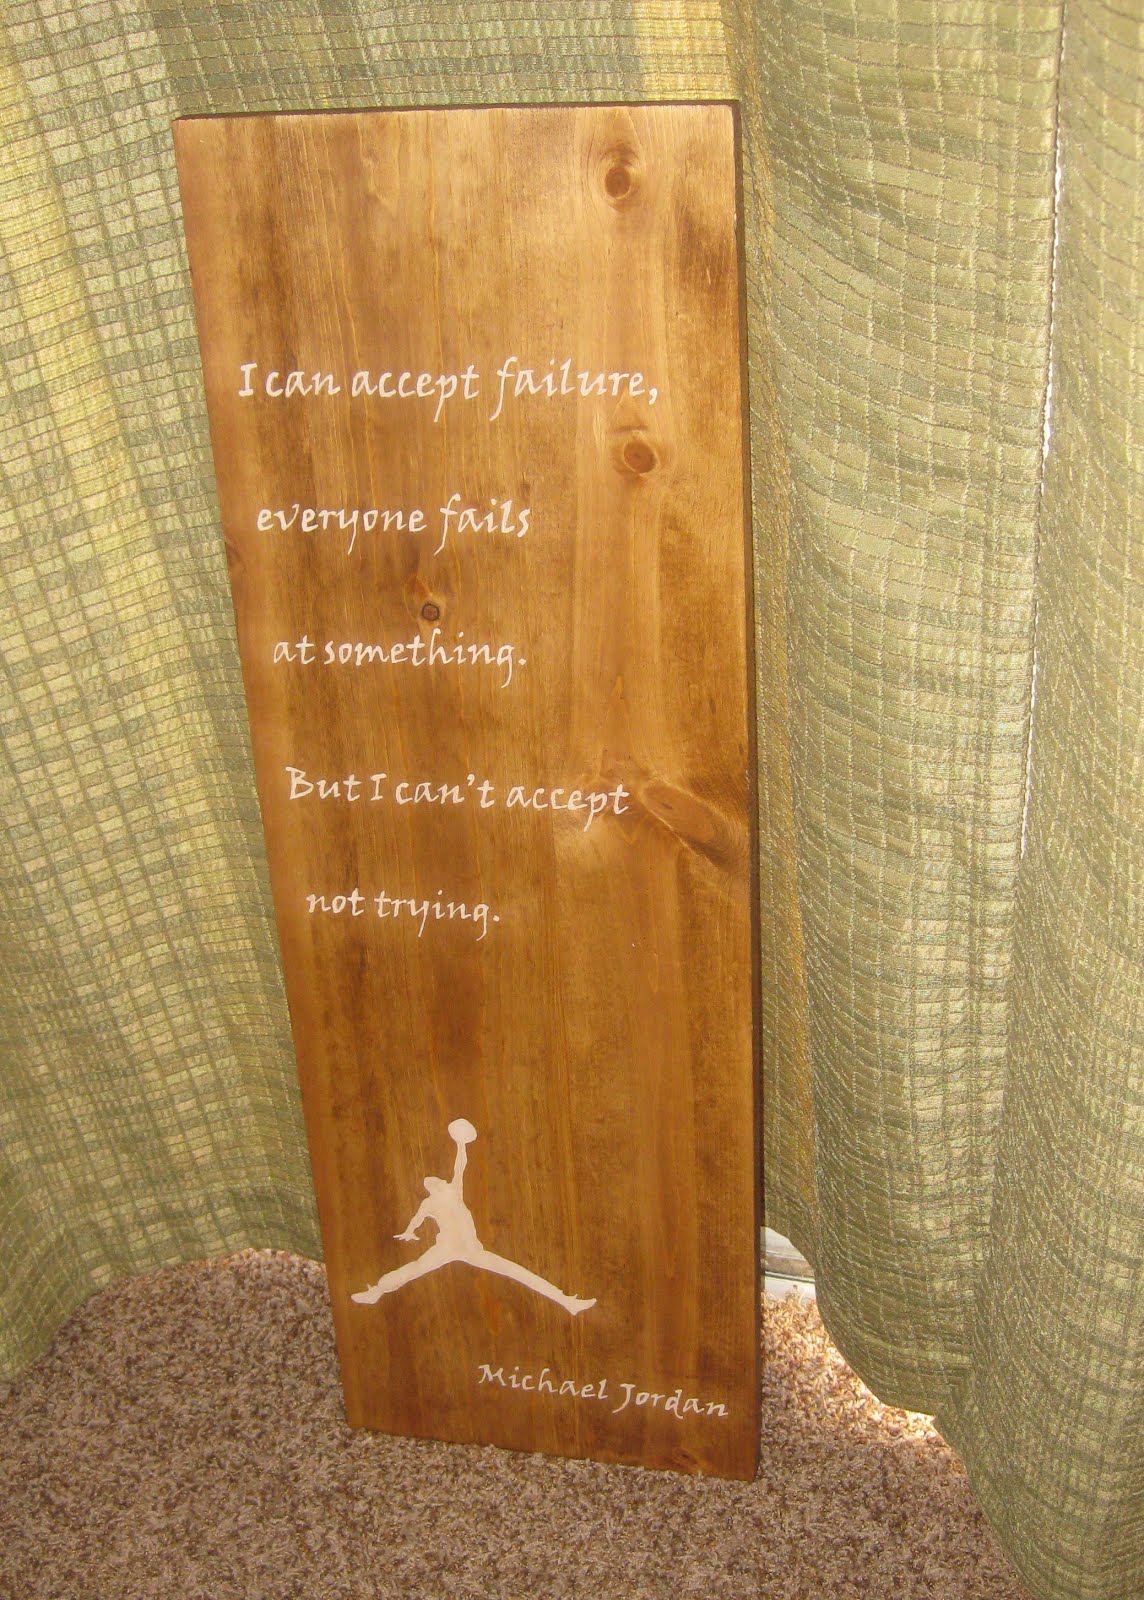
Step 10: Admire your work

It's THAT easy! Although there are a couple of 'ifs'.
IF once your done you find that your lettering doesn't show up as much as you'd like, you'll probably need to repaint over it.
And IF you decide you don't want to stain your board and that you'd like to paint it instead paint the board first, then trace your lettering onto it.

I know you're all dying to go try this out, and honestly I can't blame you! It's awesome. So go do it!

Sunday, September 18, 2011

Easy, Cheap Tips For Making Your House Sell Faster

My Inlaws have recently put their home on the market, but I guess the potential buyers have been a little under-whelmed. While they have a great house, it is on the more modest size of the homes that surround it. It does, however, have some really great things going for it. Tad's mom is meticulously clean so their house is in perfect condition, it's a good size with a ton of storage, in addition to the 3 car garage attached to the house there's an extra monster of a garage 10 yards over that is the size of a small house, it's located in a sought after area of Heber City, and it's on a good sized lot. It really is a great house all I think it needs is a little freshening up.

Now when you take that and combine it with my (and Tad's) fanatic obsession of HGTV and you get this post. So here are my thoughts, ok mostly HGTV's thoughts, on what Tad's parents, and others can do to add some zing to their homes on the market.
2 of my favorite shows on HGTV that give great tips for this are
Designed to Sell click here for site
Get it Sold click here for site
Crank up the curb appeal
Pull weeds, rake leaves and trim overgrown shrubs, especially if they block windows or the path to your front door.
My Inlaw's have a big beautiful yard that is well taken care of by Tad's mom. I wouldn't change much, except maybe some kind of rocker or table or pot on the front porch.

Paint
It's important to make your house generic. A fresh coat of neutral paint will make your home appear larger, brighter and more appealing to potential buyers.

To be realistic most people aren't going to do a lot of re-painting. I'm not sure I would make the effort unless I had to get an offer ASAP.

Candice Tip: To add a little color to your bathrooms you can buy a cute bathroom set of towels, rugs, and shower curtains at places like Ross, TJ Max, Walmart or Target. It'll make a big different in a bland bathroom.

Make repairs
Fix things like leaky faucets and sticky cabinets, and replace old screens. They may seem insignificant, but minor repairs add up in the mind of a potential buyer. They tend to overestimate how much repairs cost. You don't want to give them any reason not to put in an offer.

I think it is SO TRUE that buyer overestimate repair/updating costs. I know I do.

Rearrange
Make sure your furniture placement allows for easy traffic flow and shows the purpose of each room. If you have too much furniture, rent a portable storage device to hold things until you are ready to move into your new place. If you don't have enough furniture, borrow or rent.

I am addicted to rearranging my furniture so I love this tip. One of the biggest thing they do on the shows on HGTV is change around the furniture. A lot of times they switch pieces from room to room. You want to make sure your furniture tells buyers what the room is for. Make it simple, clean and with a good flow.

Use tape outlines on the floor instead of actually moving furniture around.

Rearranging a room to stage it for your open house? Here is a tip to save time and effort: Instead of lugging the heavy furniture around the room to see what feels best, put outlines on the floor with painter's tape. Arrange the room according to your outlines, and save your energy for counting offers.

A clean and uncluttered kitchen is a staple of home staging.

Pack up
This includes personal photos and portraits. Less is always more. The less clutter and knickknacks you have lying around, the more potential buyers will be able to see your home and what it offers. Remember, you are selling your house, not your stuff. Plus, getting a head start on packing will eliminate some stress down the road.

Sometimes I think it's hard to de-personalize your house. I mean, it's YOUR house right?! That's the thing though, if your house is up for sale then it's not really your house anymore. So take down your family photographs and put up something that can show people how beautiful 'their' potential home is.

Pack up unnecessary items and furniture before you show the house.

An overpacked living room is a red flag to buyers that your home lacks storage space. Pack up unneccesary items and furniture, and move items to your garage or a nearby storage facility. Clear the way for a sale by letting buyers see your square footage, not your personal belongings.

Candice Tip: Replace your toothbrushes and razors with beautiful flowers, lotions, or soaps.

Stage rooms with one purpose so buyers will know what it is.

Potential buyers are confused by extra rooms that have a mishmash of uses. To avoid this problem, first clear away clutter and excess furniture. Paint the walls a neutral tone and then furnish the room with a desk to stage it as a home office in which buyers will want to get down to business.

Make sure you have the right furniture in the right rooms. Have your neighbors and friends come and give you their opinions because you aren't always the best judge.

Storage space sells!

Potential buyers love homes that have lots of storage space. Since they will open your closets, it's a good idea to clear out unnecessary clutter, and organize your shelves to show off how much storage you really have. Plus, it gives you a chance to start packing, as you will definitely be moving once buyers see all that closet space.

Candice Tip: Pack away your kitchen counter items like small appliances and show off the work space you've got. Put out a beautiful bowl with some fresh fruit and vegetables and maybe a plant or an old fashioned pitcher filled with flowers! Then your kitchen will speak for itself.

Organize
When your house is meticulously organized, buyers will envision themselves living a stress-free life in your home.

Candice Tip: Set your table with some cute dishes and place mats, even if you have to go buy a set at Walmart. You can always give them to the next nephew you have that gets married!

Clean
Clean every inch of your house, and don't forget to make your windows and floors sparkle. If your carpet appears old and stained, think about replacing it. Also, make sure there are no offensive odors. Purchase an air-neutralizing spray that will help remove odors without creating an overwhelming masking odor. Clean homes sell!

Lighten up your home with natural tones and a neutral dose of style.

Lighten up
Let the sun shine in, and turn on the lights. Open all blinds or curtains, and make sure the house is well lit.

Temperature
Be sure potential buyers are comfortable when touring your home. If it's freezing outside, leave the heat on, and if it's summer, turn on the air conditioner.

Candice Tip: Take your back patio and make it a lounge space. A couple of chairs and a small table is all you need. If you have a BBQ Grill to throw on there too then that's a huge bonus! Show people the possibilities of your home.

Keep it ready to show
It may be a little inconvenient, but until you accept an offer, keep your home in tip-top shape at all times. What this means is that each room should have a clear purpose, nice flow and be clean and clutter-free. Buyers need to be able to picture themselves and their things in a room, and taking these steps will help ensure that.

While it can be hard to remember to live like you don't live there it'll be worth it in the end!

If your home is coming off a little TOO NEURAL I would pick out a color or two and splash it around your home in different areas. Shower curtains, towels, rugs, dishes, throw pillows, flowers, trays, blankets..... The possibilities are endless! Also, simple things like replacing outdated hardware like doorknobs, hinges, light fixtures or cabinet knobs can make a big impact. If you're not a designer grab someone who's got a better eye and go shopping! I would start at yard sales and thrift shops, you never know what treasures you'll find! Good luck!

Wednesday, August 17, 2011

Turn a Men's Shirt into a Women's Tank Top Tutorial

Photobucket
So I've mentioned a few times how awesome my older sister is. And she totally is. Today, however, I want to talk about my amazing little sister! Roxanne is the kind of sister that is always doing those things that you always dreamed about doing but never did. Things like taking trips to Tahoe, marching in civil rights parades, getting an apartment downtown and living it up.... Not to mention she's gorgeous, talented and adventurous.
Yeah, she's pretty cool.
AND she's a wiz on a sewing machine! She's agreed to share with us a tutorial on how to turn a men's t-shirt into a woman's tank top. :)

Photobucket
The before.

Things you'll need for this project-
Scissors
Sewing machine (or needle and thread if you're feeling ambitious)
Ruler or measuring tape
Pins
Craft pencil or something to mark on the shirt with (I used a crayon)
One of your old tank tops

Photobucket
Cut around the collar to remove it from the shirt.

Photobucket
Then decide how wide you want the straps of your tank top to be. Put the edge of the ruler or measuring tape next to the collar and mark on the shoulder where you want the tank top edge to stop.

Photobucket
Make a straight line from your mark on the shoulder to the armpit of the shirt and cut along it to remove the sleeve from the shirt. Do the same thing to the other side.

Photobucket
I marked it here with a pin.

Photobucket
Afterwards it should look like this.

Photobucket
Then turn the shirt inside out and put it on. Make a mark where you want the neckline to hit.

Photobucket
When you take the shirt off, pull the shoulders together and fold the front collar to the side.

Photobucket
Starting from your mark in the middle of the shirt start cutting up towards the shoulder in a curved shape.

Photobucket
If your shirt doesn't have a pattern on it then you can just skip this part.
If it does than go around the edges of it with some pins.

Photobucket
It should look like this when you're done, with the design outlined in pins.

Photobucket
Turn the shirt inside out and using the pins as a guide, outline where the edge of the design is.

Photobucket
This outline will help make sure that your shirt won't be uneven on the sides.

Photobucket
Take one of your tank tops and put it on top of the shirt. This will work as a basic pattern to make sure that the new shirt will fit you.

Photobucket
Using the tank top as a guide, mark on the shirt where you want the armpit on the new shirt to hit.

Then using the sides of the tank top mark the sides of the shirt. Remember to leave yourself extra room on the sides for your seam. 1 or 2 inches is usually good enough.
And remember to check your marks around the front design to make sure everything is centered.

Photobucket
Next pin along your line.

Photobucket
And then sew.

Photobucket
Turn the shirt right side out and check out your handiwork. Run a hand along the edges you just sewed to make sure there are no gaps or weak points.

Photobucket
Only thing that's left is the sleeves. Fold them against each other and cut off any extra excess.

Photobucket
Almost there.

Photobucket
And then you're done!

Ok, so I think you'll all agree with me that my sister is awesome. Cause there's no denying it. Thanks Rox for being so cool!

LinkWithin

Related Posts Plugin for WordPress, Blogger...